I just found out that In Harm's Way: StarCluster won a Gaming Genius Award for Best New Setting. That is very cool, but puzzling - if you had asked me, I would have said the game has no setting beyond some implied stuff. Still, pretty cool news and a total surprise!
-clash
Thursday, September 29, 2011
Wednesday, September 28, 2011
Goodbye To Our IHW: Aces And Angels Campaign!
We'll be starting alpha testing on In Harm's Way: Pigboats this weekend, so I had to wrap up my current game. We have been playing IHW: Aces And Angels, as a WWII warm-up. It's sort of a sequel to the long-running game we had a couple years ago, which came out of the playtest of that game. The only character that remained the same was Iolani Kalani, the Flyin' Hawaiian, who has been promoted to squadron commander on the Escort Carrier Maui. Kalani was there as sort of a player NPC - he didn't fly at all. Kalani's old squadron mates had been broken up, off training new pilots or selling war bonds.
The replacements are mostly new ensigns, fresh from flight school. The Maui, as an escort - or jeep - carrier, has only one mixed squadron with a flight of six F-4F Wildcats and a flight of six SDB Dauntless dive bombers. The six fighter pilots, the PCs, are the flight commander, "Spic", and the kids "Tuna", "Spike", "Kraut", "Shark Bait", and "Moonshine". Spic is a Puerto Rican from the Bronx, Tuna's from Atllanta, Moonshine from Nashville, Spike's a Boston Brahmin, Kraut's from Pennsylvania, and Shark Bait is the son of a couple of professors who taught all over the world.
It is the end of 1942, and all looks grim for the US, but Midway was a huge turnaround, and momentum has slipped to the Americans, though things still hold in the balance. The new pilots practice and bond together, particularly at a party given by the Flyin' Hawaiian at his family's ranch on the Big Island. Moonshine and Kraut both get lucky with Kalani's younger sisters, and Moonshine is particularly smitten. Spike is already married, and stays a bit aloof from the others, and the others respond with relentless practical jokes.
Tehy get into action in a string of air assaults on Japanese air bases in the Solomons. Kolambaranga, Keita Point, and others. The PCs get deadly as the Captain and Kalani escalate the odds at each raid. Spic and Shark Bait both get 5 kills in a single mission on different missions. Last session was a raid on Kahili, the six fighters and the five remaining bombers of the Maui against 32 fighters at Kahili.
The fighters went in two sections, four planes at a lower level to provide cover for the bombers, and two flying top cover, higher than Zeros or Oscars could reach. The Zeros came in two gaggles - their top cover was between the PC's top cover and main body, and their main body was between the PCs and the bombers. The main body of Zeros dove on the bombers while the main group of PCs dove on them. The Zero top cover zoomed down to meet them, but the PC's top cover stooped on the Zero top cover.
In both cases, the PCs used their excellent, solid Wildcats to dive through and break up the larger swarms of Japanses planes, using vertical moves where the nimble Zeros couldn't follow. Kraut was shot down as he tried to follow Tuna on a one-man assault on the Zeros chopping up the Dauntlesses. He was later rescued by a floatplane. Shark Bait got a zero on his tail, but his wingman Spike shot it up. The smoking zero purposefully rammed Shark Bait's Wildcat, but the tough Grumman fighter kept flying, though it was hammered. Tuna had to break off when a shot penetrated his pilot armor and wounded him severely.
Only two Dauntlesses made it through, and their bombs did little damage, but the fighters did very well, destroying or damaging twenty Zeros. The planes were really chewed up, though. Shark Bait's plane could be used as a Grumman advertisement for toughness. The Maui retreated and set course for Pearl in a blaze of glory. The group loved their characters, and want to return some day.
-clash
Monday, September 26, 2011
IHW: Pigboats:- Escape!
Escape
Once your sub had had its shot, and the enemy escort knows you are out there, it’s time to get out of Dodge. You have two basic choices - get out on the surface, or get out underwater.
On the Surface
Usually this is the end result of a night surface attack, but not necessarily. Speed and confusion are your friend. Use them. The more chaos you have caused up til now, the better. The big danger with a surface exit is a shot from one of the escorts penetrating the hull. Submarines have so little reserve buoyancy that one hit in the hull will sink the boat. The big benefit is speed. Surfaced speed on the diesels is so much faster than underwater speed that sometimes it is worth the risk.
Japanese Escort Guns
Japanese escorts had guns ranging from 3 inch on frigates to 4 inch on covettes to 5 inch on destroyers. Cruisers in a battle group would have 6 or 8 inch guns.
Ramming
A favorite tactic for larger escorts is ramming. Destroyers have a heavy sharp bow that can crush through a sub hull like paper. Mid-sized corvettes were known to do this also. Small frigate-type escorts had neither the mass nor structural strength to ram. A rammed sub is destroyed.
Japanese naval lookouts are very good, and their optical equipment is superb. Rate them at +4, with an endurance of 9.
Night Modifiers are -2 Large for dark nights, -1 Large for bright nights.
Chaos Modifiers are given by the GM, and should range from +0 for a bungled attack to -2 for a devastating attack.
Underwater Escape
For most of the war, this was the preferred method of escape until night surface attacks came into vogue in mid 1944. In this, the submarine attempts to creep away silently underwater after the shot. The faster the sub moves, the more easily it can be detected - 0-2 knots -1 Small Modifier, 3-4 knots +0, 4-5 knots +1, 6-7 knots +2, 8 knots +3, 9 knots +4 Small Modifiers.
Japanese Escort SONAR
Japanese SONAR was fair, though not as good as American equipment. Effectively, rate Japanese SONAR at Acquisition +2 to locate the sub. An escort needs 3 successes to lock the submarine, in which case depth charges have a +1 chance. If SONAR gets only 1 or 2 successes, the escorts can only get a general area reading with hydrophones, with the depth charges at standard effectiveness. If no successes are rolled, the sub escapes. Once SONAR is rolled, it is not re-rolled until the situation changes.
Silent Running
A sub can go to Silent Running mode, in which all pumps and AC is shut down. This gives a -1 Small Modifier to be detected. For each hour is Silent Running mode, all crew END goes down by 1, due to increasing heat and no ventilation.
The Knuckle
By accelerating fast underwater, then making a sharp turn, the submarine can create a hard “knuckle” of turbulent water in the wake of the sub, whereupon the sub rapidly slows to creeping speed.
The “knuckle” will reflect SONAR pings as if it were a sub underwater for several minutes. The Diving Officer needs to make a Tactics check when attempting to create the “knuckle”. Each success gives a Small Modifier penalty for the escort’s SONAR Acquisition check. On a failure, the escort will depth charge the “knuckle, letting the submarine escape.
A knuckle can also be created on diving from the surface.
Thermoclines
There may be a thermocline - a layer of water at a very different temperature than the layer above it - which can reflect SONAR pings. The escort has -3 Small Modifiers to success in Acquiring a sub under the thermocline - if such a themocline exists.
A thermocline can be located by the sub’s Signals Officer with a successful Acquisition check and 3 or more successes.
Tuesday, September 20, 2011
IHW: Pigboats - Positioning
Positioning is the art of putting your submarine in the right place at the right time to intercept the target. If the target’s course is simple - a straight line - a simple successful Tactics check by the Assistant Approach Officer will tell you if it is possible or not, but only very fast ships take a straight course in wartime - there are submarines out there, after all! - and it will most likely be a fruitless chase. Usually, the target is running some sort of zig-zag pattern designed to make it difficult to get into position.
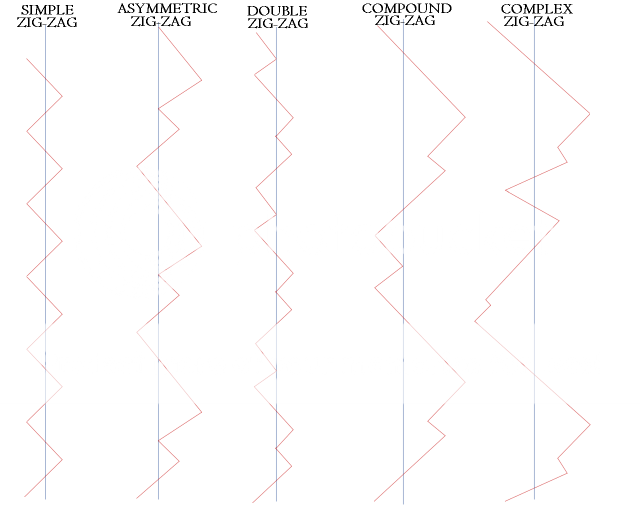
Simple Zig-Zag
A Simple Zig-Zag is a single symmetric zig followed by a mirror image zag, which repeats. This has -1 Small Modifier to solve. Roll 01-10 on d% for the enemy to be using this pattern.
Asymmetric Zig-Zag
An Asymmetric Zig-Zag is different on each side of the true course. This has a -2 Small Modifier to solve. Roll 11-30 on d% for the enemy to be using this pattern.
Double Zig-Zag
A Double Zig-Zag is symmetric, but composed of two repeating patterns either side of the base line. This has a -3 Small Modifier to solve. Roll 31-70 on d% for the enemy to be using this pattern.
Compound Zig-Zag
A Compound Zig-Zag is an asymmetric, multiple, irregular zig-zag. This has a -4 Small Modifier to solve. Roll 71-90 on d% for the enemy to be using this pattern
Complex Zig-Zag
A Complex Zig-Zag is an asymmetric zig-zag with a long, almost random, periodicity, at multiple angles to the baseline course. This has a -5 Small Modifier to solve. Roll 91-00 on d% for the enemy to be using this pattern.
Reducing Difficulty by Observation
You can reduce the penalties to figure out a zig-zag pattern by repeated periscope or other range-and-bearing observations over time. The observations need to be taken from different positions along the base course. The Approach Officer needs to roll a successful Observation check through either the periscope or other range-and-bearing equipment at each observation. Each successful observation - before rolling Tactics - up to the third reduces the modifier by one Small Modifier. Stating that the Assistant Approach officer is rolling a Tactics at any time puts the submarine at a firing point, and an unsuccessful roll means a blown attempt, far out of position.
Night Modifiers are -2 Large for dark nights, -1 Large for bright nights.
Avoiding Escorts
Generally, both merchant convoys and large warship groups are surrounded by escorts - destroyers or other Anti-Submarine Warfare (ASW) craft - patrolling various arcs around the main body, looking for you. There are several standard tactics to slip inside this ring of protection:
Hit ‘Em Where They Ain’t
By timing the escorts’ patterns, the submarine attempts to slip between two escorts at the most opportune time. The Approach Officer must make a successful Observation check with a penalty of 2 Small.
Dig Under the Fence
Using thermoclines - layers of cold water that tend to reflect SONAR pings - the submarine attempts to slip directly under an escort. The escort has -3 Small Modifiers to success in Acquiring a sub under the thermocline - if such a thermocline exists.
A thermocline can be located by the sub’s Signals Officer with a successful Acquisition check and 3 or more successes.
Using Geography
The submarine lies is wait just awash in shallow water at a headland on the coast or an island which the convoy must round. When the escorts all go to seaward to protect the convoy, the conviy lies open to the sub. Of course if anyone sees the sub, it will be helpless sitting there in shallow water. The Navigator may make a Tactics check to find such a place, with each success meaning a better ambush site.
Look! Behind You!
If working with another sub in a wolf pack or a duo, one sub attacks an escort on the other side of the convoy, drawing the other escorts from the unengaged side, clearing the way for the second submarine.
I’m One of You!
With a large number of escorts on a dark night, the submarine slips into the ring of escorts, acting like one of them, before cutting into the ring and attacking. Of course if the escorts aren’t fooled, the sub is a sitting duck.
The Rush
Going in at night on the surface, the submarine sinks one of the lead escorts and goes through the gap, right through the convoy from front to rear, raising chaos in its wake. If this works, it can shatter the convoy. If it doesn’t...
-clash
Saturday, September 17, 2011
IHW: Pigboats VCS - The Final Cut
A Vehicle Control Sheet is like a character sheet for the vehicle. By manipulating the items on the sheet, you control the vehicle. Here is an example VCS for a Gato Class Submarine, with explanations to follow:
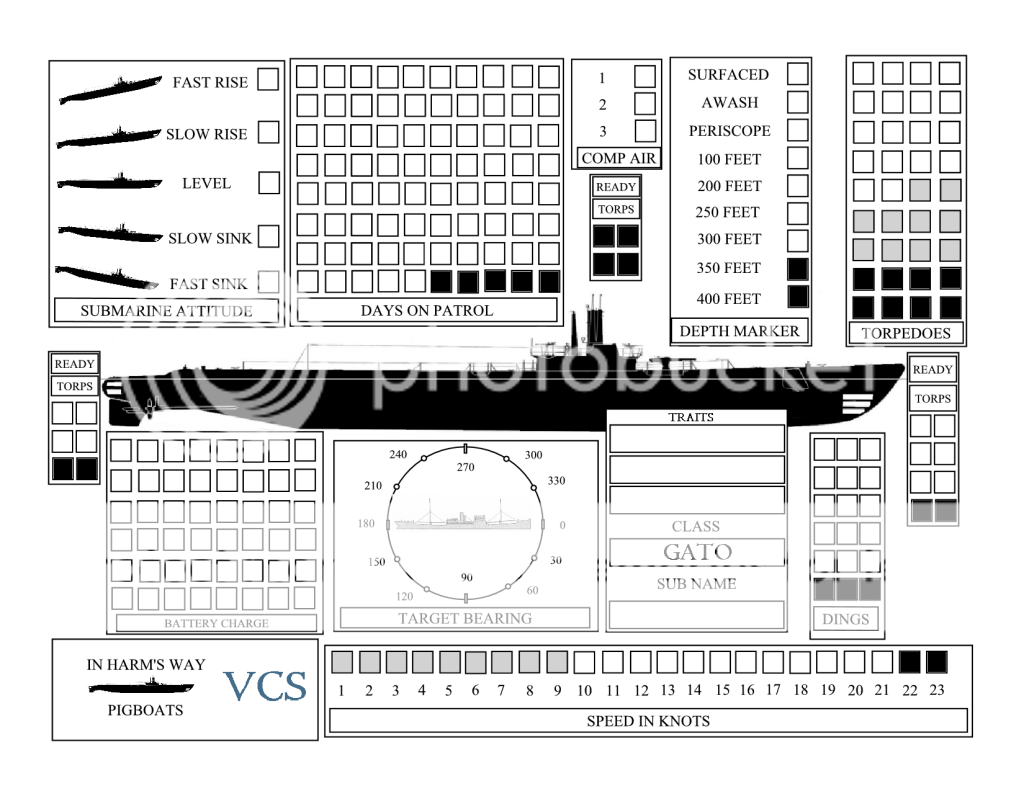
Submarine Attitude
This is the pitch of the sub - nose up, level, nose down. Use a token and move it over the current attitude.
Days On Patrol
This is the the track for both fuel and food. Blacked in squares are unusable. A Gato has a very long cruising period - 75 days - so there are very few blocked off. Cross off each day you are on patrol.
Compressed Air
Compressed air is used for many purposes, but three in particular are vital - blowing ballast tanks to rise up, Releasing some overboard with some oil to trick an escort into thinking it made a kill, and refreshing air when running silent. You have 3 uses of compressed air. Whenever you use it, check off a box. You can recharge compressed air whenever you are surfaced for at least 30 minutes.
Depth Marker
This shows how deep you are. Use a token and slide it to show your current depth. The black boxes are those past your test depth - the Gato has a test depth of 300 feet. You can go past your test depth, but you run a high risk of springing leaks or imploding. The pressures down here are immense. A hole the size of a pea can produce a water jet powerful enough to cut a man in half.
Torpedoes
This shows how many used torpedoes you have available. The gray boxes are those already loaded in the tubes and indicated elsewhere. When you load a torpedo into a tube, cross it off here. The Gato carries 28 torpedoes, 10 of which are already loaded in the tubes.
Ready Torps
These are your torpedo tubes - each open box represents a tube. Blacked out boxes do not represent tubes. When you fire a torpedo tube, cross off the box. When you reload a tube, erase the x. Tubes can be located one of three places - at the bow, amidships, or aft. The Gato has six tubes in the bow, none amidships, and four in the stern.
Battery Charge
This is your battery charge. Each box is enough power to move the boat at 2 knots underwater for one hour. The Gato's batteries can keep the boat going at this rate for 48 hours underwater without being exhausted. The faster you go, the more quickly you use up energy. Consult the chart as to the exact rate.
Target Bearing
This is a mini bearing chart you can use for targeting if you are not using the big Target Bearing/Range chart. Use tokens to indicate contact bearings.
Identification Block
This block is used for information about the sub - the boat's traits, Class, and name. Write in the boat's traits at top, and the name on the bottom. Each class has its own VCS, with the class pre-printed.
Dings
These boxes represent damage to the sub. Cross off a box for each ding taken from depth charges, shells, or bombs. Some dings can be immediately repaired by Damage Control, so only mark off dings that were not contained. A Gato is tough, and can take up to 15 such dings before it begins sinking from damage.
Speed In Knots
This is a speed track. Use a token to mark the current speed. The blacked out boxes are inaccessible, marking the maximum surface speed, while the gray boxes indicate underwater speed - the marker cannot move into the white boxes while underwater. The Gato subs could go up to 21 knots on the surface, and a maximum of 9 knots underwater.
-clash
Friday, September 16, 2011
Tracking Convoys in IHW: Pigboats
Here's the Target Bearing /Range Chart:

The long oval in the center represents your submarine. The rest of the chart displays how far away and in what direction a contact is. Use tokens for contacts, as they will move.
As the sub moves toward the contact - and/or the contact moves towards the sub -the target moves into a new, closer range band. When the sub and contact move away from each other, the contact moves into a further off range band. As the contact comes closer, it should begin to resolve into separate contacts - first for the larger ships, then for the smaller ships. If your sub is in the middle of a convoy, having penetrated the escort, you might have contacts all around your sub.
The bearing is the relative angle from your sub to the contact. The chart is split into 90 degree quadrants, so zero degrees on the bow means straight ahead, while zero degrees astern means directly behind you. From zero, the degrees increase to 90 degrees to the right and left, then decrease back to zero. Right and left are always relative to zero on the bow, even when talking about bearings astern. So, to place a marker at "40 degrees on the right bow", find zero degrees on the bow and move the marker clockwise to forty degrees. For "40 degrees right astern", find zero degrees astern, and move the marker counter-clockwise forty degrees.
If the sub changes its own course, move the contacts the same number of degrees. For example, you get a contact at 20 degrees on the left bow. The captain decides to turn towards the contact to lessen the range and investigate. Move the contact to zero degrees on the bow and begin stepping the range in.
-clash
Thursday, September 15, 2011
Mo' IHW: Pigboats Character stuff
So - this is where I am. However it occurs - point auction, election, funny dances, mime performances, whatever - you end up with the following:
One Skipper - a Lieutenant Commander with zero Notice. A bit older than the other officers (age 34), he is also more skilled, though his physical Attributes have degraded a skosh.
One XO - A senior Lieutenant, he starts with 200 Notice, and at age 30, he is competent enough to take charge in an emergency, though he doesn't rate being the Skipper by rank.
Two other Lieutenants, age 28, with zero Notice. They hope to become XOs eventually, and one day, if they are lucky and skillful, they may attain the holy rank of Skipper. They are competent enough, but they are still young.
Two Lt. jgs (Lieutenant, junior grade), age 26, with zero Notice. They are not mere Ensigns any more, and are vastly proud of this accomplishement. They consider themselves old and wise in the ways of the world. The Lieutenants are amused by them.
Two Ensigns, age 24, with zero Notice. Fresh-faced kids just out of College, Submarine, and Command School, they think they know what to do and are destined for savage disappointment and much skull thumping learning ahead. No one would trust them to mind a watch on their own. They are probably not trusted to find their arse in the dark with both hands.
From this raw material, the Skipper assigns roles, both in battle and out of combat. A Lieutenant, because of his skill set, might be both Navagator out of combat, and Signals Officer in combat. The Skipper might assign himself the role of Approach Officer, manning the periscope or TBT (Target Bearing Transmitter) while his XO is the Assistant Aproach Officer, familiar with the ways of the TDC (Torpedo Data Computer), and able to predict the chase's zig-zag path and plot a course to put the sub in the most favorable attack position. Or he may switch and let the XO or a Lieutenant make those obsevations and keep the big picture in his head using the TDC.
Every Officer has a role to play in combat. The Approach Officer may shout "Fire One!", but the result is a team effort.
-clash
Monday, September 12, 2011
In Harm's Way: Pigboats - Rank Auction 2
It's looking like rank auctioning is not a popular option, based on feedback here and on Google+. I do *not* want to force this down anyone's throat, but in this game, older means more skills and lower stats, and higher rank means older. I want to give players a chance to come in at the rank they want, without crippling them, and without putting jealousies and anger into play.
In my many military games, I have found no one gets jealous of another player character getting a higher rank if they think that player earned it. Up til now, I have been tending to bring PCs in at the same rank, and letting them earn their rank, but I was hoping to get a shortcut, so I can have a submarine start out with a PC in charge, rather than an NPC. The sub's skipper gets to "squeeze the pickle" - i.e. aim and fire the torpedoes - so starting out with an NPC skipper sort of cuts down harshly on the fun.
Maybe I should just use point buy points, cut out the optional random generation, and chalk the stat loss up to aging. i could do that, but that's boring... :D
-clash
IHW: Pigboats - Rank Auction
Went through what I have written so far, and - as I feared - Bonni was right to warn me. The captain was doing too much and the other officers too little. If it wasn't the captain doing it, it was the ratings, and while in a game with troupe play that is cool, Pigboats is not all about the troupe play. I have to go through and assign stuff to officers, even if they aren't actually doing the work. Example - Hydrophone contact, range and bearing. That is the Sonarman's work, but with this setup, it's the Signals Officer that should roll for it.
So I'm wondering - should I have a rank auction at the beginning of the game? Amber has a stat auction. I'm thinking you could bid on taking higher rank by taking on complications. "Bad relations with CO." "In love with fellow officer's wife." "Secret alcoholic." etc. Each complication having a different point value. Whaddya think?
-clash
Friday, September 9, 2011
IHW: Pigboats - Focusing Tighter
I was initially going to allow the submarines in IHW: Pigboats to be from a range of countries - The UK, Germany, The USA, Japan, Italy, and the Netherlands, like I did the pilots in IHW: Aces In Spades and IHW: Aces And Angels. I have decided to forget about that. I may cover a nation at a time in supplements, if it comes to that, but for the released game I will focus on the US Navy and the Pacific war - the US subs were pretty much non-entities in the Atlantic.
Why? Because I can do some interesting things if the scene is limited. I can - for example - craft a mission generator with specificity, changing the locales offered as the war goes on, with new operating areas opening up and new forward bases established. I can make a generator for situations during the R&R period between missions. I can allow add-ons to the subs - the US subs were refitted after each mission with new and better gear. I can make a much better, more focused target selection. I don't have to account for the differences between the small Japanese convoys and the enormous Allied ones, or between Allied and Axis escort gear and tactics.
This is a pretty important decision for me. I've been agonizing over it for days, but it will be better in the long run, I think.
-clash
Wednesday, September 7, 2011
Wrapping up My IRC Game
Finished up this year's IRC run of In Harm's Way: Napoleonic Naval. This campaign has been going on for five years every spring and summer, alternating with a StarCluster game that has been running since 2003 every fall and winter. This year we:
* Lived through an earthquake and tsunami, and rescued various people caught up in it.
* Captured 3 pirate vessels
* Captured a heavy French Naval Corvette
* Met an English princess in disguise
* Took a pirate camp by assault over land - enemy land at that!
* Married off two characters - one who is retiring from play, and one who is continuing.
-clash
Monday, September 5, 2011
Excerpt From In Harm's Way: Pigboats
Attack
Once at the point where the best shot would occur, the submarine can Attack. The decision on whether to shoot single torpedoes or spreads, and how many torpedoes in the spread, would be made and the torpedoes launched. If circumstances permitted it, multiple Attacks could be launched - especially if the submarine got right in among the ships of the convoy or battle group, for instance in a night surface action, but more usually it was a single attack on one or more ships made all at once, with the submarine then attempting to Escape the escorts.
Single Shot
On a Single Shot, one torpedo is shot from a tube. The firing officer rolls a Torpedo check, modified by the Range and Target Bearing.
Spreads
On a Spread, multiple torpedoes are shot at a single target. The firing officer rolls a Torpedo check, modified by the Range and Target Bearing, plus a Small Modifier Bonus per torpedo after the first - plus 1 Small Modifier for the second torpedo, plus 2 Small Modifiers for the third, etc. If the roll is a success, successively add a Small Modifier Penalty for each extra torpedo to see if it hit.
StarPerc Spread Example
The officer fires a spread of three torpedoes at a target Bearing 25 degrees right and at Short Range. Bearing modifier is -10, and Short Range is +0. Three torpedoes in a spread gives a +20, and adding the -10 Bearing penalty gives a net of +10 to the TN. The firing officer has Torpedo+2 and a COOR of 9, giving him a TN of 55%. This is modified to 65% because of the +10 from Range and Bearing. The officer’s player rolls a 47, so one torpedo hit. Adding +10 for the next torpedo gives a 57, still under 65, so it is also a hit. The third torpedo adds another +10 to give 67, over a 65, so it’s a close miss. Roll Quality for 2 torpedoes.
StarZero Spread Example
The officer fires a spread of three torpedoes at a target Bearing 25 degrees right and at Short Range. Bearing modifier is -1, and Short Range is +0. Three torpedoes in a spread gives a +2, and adding the -1 Bearing penalty gives a net of +1 to the roll. The firing officer has Torpedo+2 and a COOR of 9, giving him a bonus of +3. This is modified to +4 because of the +1 from Range and Bearing. The officer’s player rolls a 2, for a total of 6, so one torpedo hit with 2 successes. Adding -1 for the next torpedo gives a 5, still a hit, but with one success. The third torpedo adds another -1 to give 4, also a hit with once success.
StarNova Spread Example
The officer fires a spread of three torpedoes at a target Bearing 25 degrees right and at Short Range. Bearing modifier is -1, and Short Range is +0. Three torpedoes in a spread gives a +2, and adding the -1 Bearing penalty gives a net of +1 to the roll. The firing officer has Torpedo+2 and a COOR of 9, giving him 3 dice and a bonus of +1. This is modified to +2 because of the +1 from Range and Bearing. The officer’s player rolls a 2+4+2, for a total of 10, so one torpedo hit. Adding -1 for the next torpedo gives a 9, still a hit. The third torpedo adds another -1 to give 8, a miss.
Subscribe to:
Posts (Atom)